


Ritual of Raven is a story-based, witchy farming simulation, where you enchantment robot-like creatures to do the farming and mining. The game scored our highest rating and you know our motto: when we love a game, we try to make a guide!
Ritual of Raven Guide – Table of Contents
The Ritual of Raven Guide will give some top tips, help with unlocking all the Arcana Constructs and detail the special gifts for the residents. Click on the coloured writing to reveal more details.
Top Tips
Mastering The Fool
Arcana Puzzles – Nevar Village
Arcana Puzzles – Crystal Forest
Arcana Puzzles – Swamp of Secrets
Arcana Puzzles – Cloud Realm
Special Gifts
Top Tips
Maximize the First Two Days
There is no stamina in Ritual of Raven, and the clock appears on day 3. So it’s worth making the most of the first couple of days. Picking all the wild flowers and grass from around the cottage, Moon Shrine and ritual circle not only gathers ingredients needed for the ritual, but you can also find decorations and shards (I gathered over 900 shards).
Good Night Sleep
If you’re not in bed by 2am, then the game will automatically enter its end of day save procedure. No shards nor morning time lost.
Picking grass
Use A on a patch of grass to remove it, you might also receive some shards or decorations.
Opening the Wheel Menu
Use L to open the wheel menu and R Stick to select the option. By default the wheel menu needs to be held open with L, whilst the option is selected, however this can be made into a toggle via the setting/accessibility menu.
Shortcuts: X to open your inventory, and – to open the Book of Shadows.
Placing Decorations and Fields
Use the wheel menu and select the placement option. Use L or R to move between decorations and fields. Use A to select the object. Objects stored in chests will be available.
Alternatively, select the object from your inventory and press X for more options. Choose Place to access the placement window.
Removing or Moving Decorations and Fields
Use the wheel menu and select the placement option. Minimise the placement menu by using the D-pad down and then the pick up option becomes available. Use the L stick to move the object, or B to put it into inventory.
Running
Use ZL to run. This can either be held, or used as a toggle, if altered in the settings/accessibility menu.
Wobbly Text
By default, emphasising speech is done via letters and words moving within the text. However, this can be disabled via the settings/accessibility menu.
Saving/Loading Enchantments
It’s worth considering saving enchantments for specific tasks (e.g. farming or mining) or for specific Arcana Constructs.
Removing or Adding Enchantment Cards
To remove all of the enchantment cards, use the Clear at the top of the enchantment window.
To remove just one card from the enchantment, select the card then press and hold Y.
If removing an enchantment card which has pink brackets, you’ll get the option to remove all the cards within the brackets as well.
Previewing the Enchantment
Use D-pad down from the enchantment window to preview the actions. This is especially useful for movement type enchantments. It’s possible to make some adjustments to the current enchantment via the preview screen.
Altering the Moon Phases
Use A to rotate the active dial. The active dial has a white highlighted outer circumference.
Use L stick to move between the dials.
Using Rapid Growth and Altering the Moon Phase
Some crops will produce special flowers under the light of different moon phases. If you are using Rapid Growth to speed up production, make sure you are already in the correct moon phase, or end on a Water card, the day before the crop is to be harvested.
Sharding Portals
You unlock other Sharding Portals via Spell Jar recipes. These additional Sharding Portals give higher prices for particular items – look out for items with green price tags and avoid the red ones!
Return to the Table of Contents
Mastering The Fool
Ritual of Raven guides you through, step by step, the initial enchantments:
Task 1: Harvest a single lavender.
Enchantment: Harvest
Task 2: Harvest another single lavender, by using Move.
Enchantment: Move – Top Right: 2 tiles; Harvest
Task 3: Harvest final lavender. This is the first time you can make a mistake with the enchantment.
Enchantment: Move – Bottom Right: 1 tile; Harvest
Task 4: Plant a pansy seed.
Enchantment: Seed (Pansy)
Task 5: Plant another pansy seed.
Enchantment: Move – Top Left: 1 tile; Seed (Pansy)
Task 6: Don’t forget to water.
Enchantment: Water; Move – Bottom Right: 1 tile; Water
Task 7: Harvest the pansy leaves.
Enchantment: Harvest; Move – Top Left: 1 tile; Harvest
Return to the Table of Contents
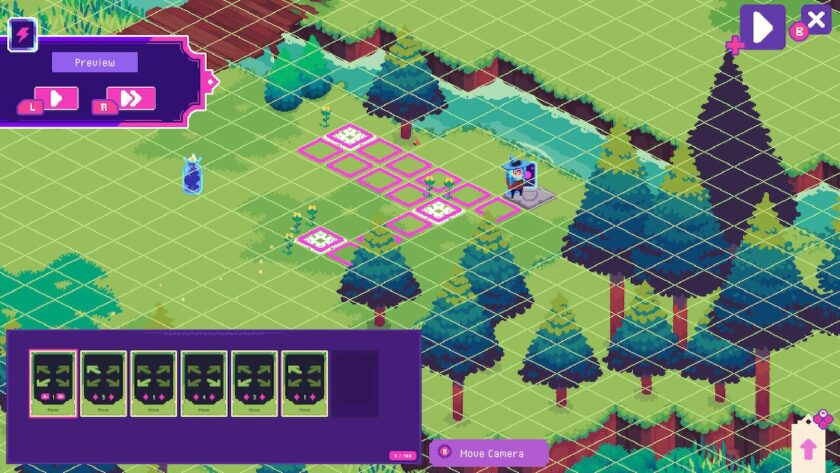
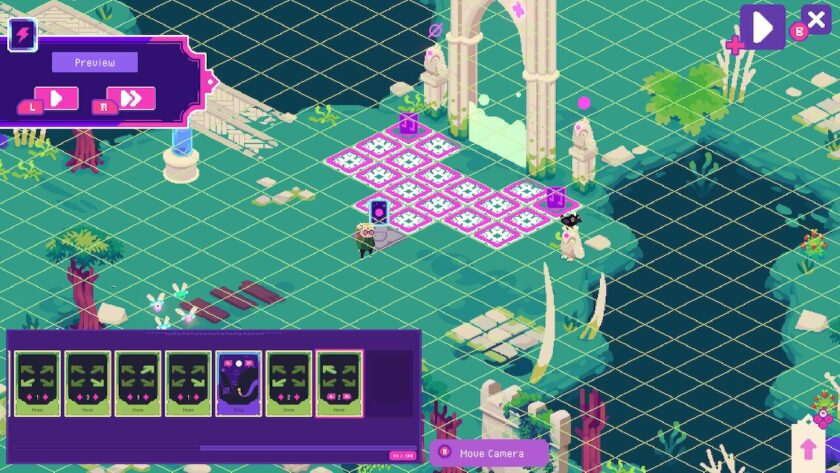
Arcana Puzzles – Nevar Village
There are 5 additional Arcana Constructs in Nevar village.
Temperance
To unlock Temperance, you need to guide the Arcana Construct across the glowing tiles on the bridge, making sure you only step on each tile once.
It’s possible with 5 Move cards.
Enchantment:
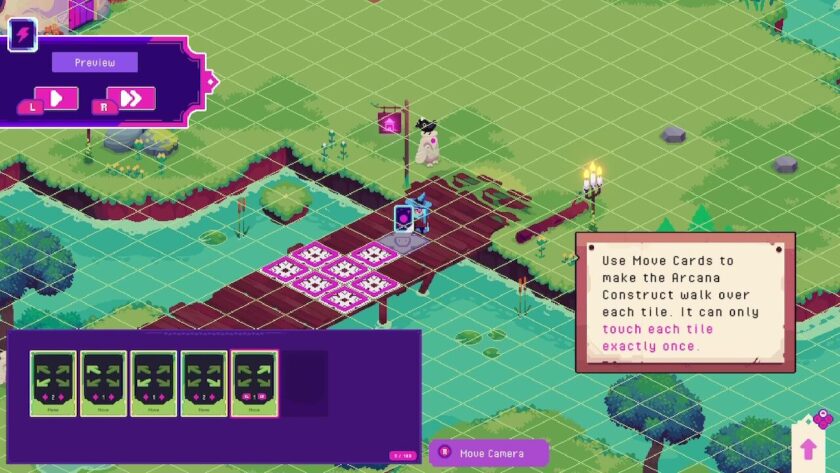
Enchantment: Move – Bottom Left: 2 tiles; Move – Top Left: 1 tile; Move – Bottom Left: 1 tile; Move – Bottom Right: 2 tiles; Move – Top Right: 1 tile.
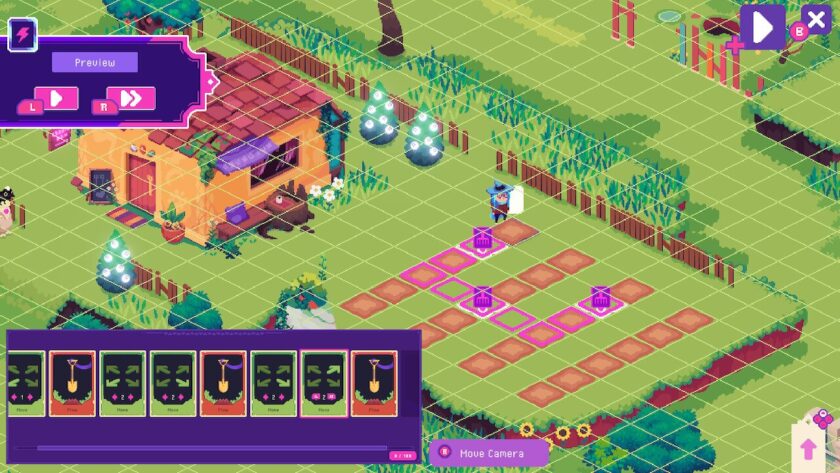
You’ll need to use Temperance to harvest Bowie’s field. This introduces the Field card. One advantage of the Field card is that you don’t need to enchant moving the Arcana Construct towards the area. They will automatically proceed to the tile nearest the Field signpost without extra instruction.
How to harvest the field:
Enchantment: Field ref: 2; Harvest.
Following Bowie’s conversation about the sharding portals, you’ll receive the Plow card, as well as some seeds and Field signposts.
The Emperor
Recommended card: Plow
You receive this from Bowie as part of the quest.
As part of the Meet Dan main quest you’ll need to grow some rosemary and plough the fields to the side of the diner.
Note: speaking to Charly and Coco for the Meet Charly & Coco main quest will give you access to the Rapid Growth card. This acts like an overnight cycle, moving the plant’s growth on by a day and it can be used multiple times to enable flowers to be harvested in one day.
Do I need to plough the whole area?
You only need to plough the 3 tiles missing from the straight lines.
Enchantment:
Enchantment: Move – Bottom Left: 1 tile; Plow; Move – Bottom Left: 2 tiles; Move – Bottom Right: 2 tiles; Plow; Move – Bottom Right: 2 tiles; Move – Top Right: 2 tiles; Plow
The Star
Recommended card: Clean Up
You receive this from Bowie as part of the quest.
As part of the Preparing the Stage main quest, you’ll need to clean up around the stage area. The Clean Up card smooths away ploughed fields, and will also pick weeds and remove rocks and rubbish.
You need to move The Star over each ploughed tile and clean up on it.
Enchantment:

Enchantment: Move – Bottom Left: 2 tiles; Clean Up; Move – Bottom Left: 1 tile; Move – Bottom Right: 1 tile; Clean Up; Move – Bottom Right: 3 tiles; Clean Up
The Chariot
Recommended card: Loop
You purchase this from Charly for 150 shards.
Unlocking The Chariot is not part of any main story quest, but will help to complete the Nevar Arcana side quest.
It might be tempting to use multiple Move cards, but the puzzle is limited to just 3 cards.
Enchantment:

Enchantment: Loop – 6; within the Loop brackets, Move – Top Left: 1 tile; within the Loop brackets, Move – Bottom Left: 1 tile
The Sun
Unlocking The Sun is not part of any main story quest, but will help to complete the Nevar Arcana side quest.
To access the area, you’ll need to complete the Spell Jar: Thorny Problems.
Is there a specific order to move over the tiles?
Yes. Look around the area, do you see anything which might indicate numbers?
Enchantment:
Enchantment: Move – Bottom Left: 1 tile; Move – Top Left: 5 tiles; Move – Bottom Left: 1 tile; Move – Bottom Right: 4 tiles; Move – Bottom Left: 3 tiles; Move – Top Left: 1 tile
Return to the Table of Contents
Arcana Puzzles – Crystal Forest
There are 5 Arcana Constructs in the Crystal Forest.
The Wheel of Fortune
Recommended card: Sing
You receive this from Dan as part of the quest.
As part of The Crystal Forest main quest, you’ll need to remove the crystals blocking the path. The Sing card will shatter crystals as long as the correct note is sung.
You need to move The Wheel of Fortune to the highlighted tile and sing the correct note.
Enchantment:
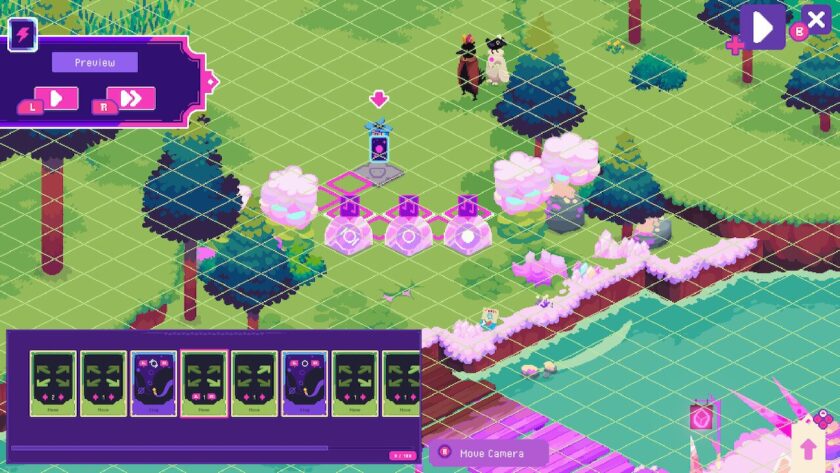
Enchantment: Move – Bottom Left: 2 tiles; Move – Bottom Right: 1 tile; Sing – circle with two lines either side; Move – Bottom Right: 1 tile; Move Top Right: 1 tile; Sing – open circle; Move – Bottom Right: 1 tile; Move – Top Right: 1 tile; Sing – solid circle
The Magician
Recommended card: Crystal Extraction
You receive this from Calytrix as part of the quest.
As part of A Liquid Crystal main quest, you need to extract liquid crystals from the ground in the Crystal Forest.
You need to move over the tiles as shown, but also extract the opal.
Enchantment:
Enchantment: Move – Bottom Left: 3 tiles; Extract Crystal; Move – Bottom Left: 2 tiles; Move – Top Left: 2 tiles; Move – Top Right: 2 tiles; Move – Bottom Right: 4 tiles; Move – Top Right: 2 tiles; Move – Top Left: 1 tile
Justice
Recommended cards: Extract Crystal; Give; and Move To
You receive Extract Crystal from Calytrix as part of a quest.
You purchase Give for 50 shards and Move To for 150 shards from Charly.
Unlocking Justice is not part of any main story quest, but will help to complete the Crystal Forest Arcana side quest.
You need to extract and then gift the appropriate liquid crystal to the orbs.
What does the blue orb want?
Liquid Aquamarine
What does the red orb want?
Liquid Jasper
Enchantment:

Enchantment: Move – Top Right: 1 tile; Move – Bottom Right: 1 tile; Extract Crystal; Move – Top Right: 3 tiles; Move – Top Left: 2 tiles; Extract Crystal; Move To – four dots; Give – Liquid Aquamarine; Move To – zigzag; Give – Liquid Jasper
You could just use the Move card rather than Move To.
The Empress
Recommended cards: Wait Minute; and Loop
You purchase Loop for 150 shards and Wait (both in-game minutes and hours) for 300 shards from Charly.
Unlocking The Empress is not part of any main story quest, but will help to complete the Crystal Forest Arcana side quest.
Enchantment:
Enchantment: Loop – 3 turns; within the Loop brackets, Wait Minutes – 5 mins; within the Loop brackets, Move – Bottom Left: 4 tiles
The Moon
Recommended card: Extract Crystal; Fuse Crystals; Move To; and Give.
You receive Extract Crystal and Fuse Crystals from Calytrix as part of the main quests.
You purchase Give for 50 shards and Move To for 150 shards from Charly.
Unlocking The Moon is not part of any main story quest, but will help to complete the Crystal Forest Arcana side quest, and you will need the different crystals within the area to complete other quests.
To access the area, you’ll need to complete the Spell Jar: Flawless Crossing.
What does the white orb want?
Moonstone Fragment
Enchantment:

You can extract any of the surrounding crystals.
Enchantment: Move – Bottom Right: 1 tile; Move – Bottom Left: 2 tiles; Extract Crystal; Move – Bottom Left: 1 tile; Extract Crystal; Move – Bottom Left: 1 tile; Extract Crystal; Fuse Crystals – Liquid Moonstone; Move To – teardrop; Give – Moonstone Fragment.
Return to the Table of Contents
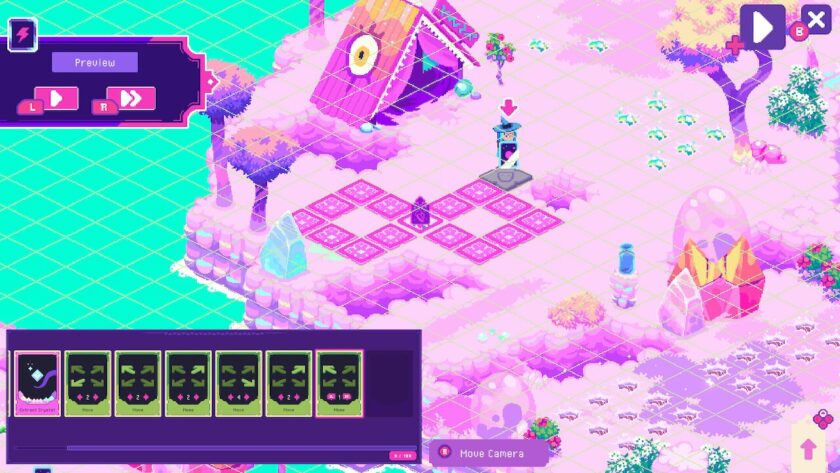
Arcana Puzzles – Swamp of Secrets
There are 5 Arcana Constructs in the Swamp of Secrets.
The Hermit
Recommended cards: Sing; and Move
You receive these as part of earlier main quests.
As part of The Swamp main quest, you need to remove the barrier.
Enchantment:

Enchantment: Move – Bottom Left: 2 tiles; Move – Bottom Right: 3 tiles; Sing – circle with line through it; Move – Top Right: 4 tiles; Sing – circle with part triangle.
Strength
Recommended card: none
Unlocking Strength is part of A Tidbit of Fairy Magic main quest.
Enchantment:
Enchantment: Move – Top Right: 1 tile; Move – Top Left: 1 tile; Move – Top Right: 1 tile; Move – Top Left: 2 tiles; Move – Top Right: 2 tiles; Sing – circle with line through it; Move – Bottom Right: 1 tile; Move – Bottom Left: 1 tile; Move – Bottom Right: 3 tiles; Move – Top Right: 1 tile; Move – Bottom Right: 1 tile; Sing – solid circle; Move – Bottom Left: 2 tiles; Move – Top Left: 2 tiles.
The Devil
Recommended cards: Field; and Check Plant.
You receive Field at the start of Ritual of Raven, however, you will need a 6×6 field signpost. You can purchase one from Pistachio for 200 shards, although you will find one later in the game.
You purchase Check Plant for 500 shards from Charly.
Unlocking The Devil is not part of any main story quest, but will help to complete the Swamp of Secrets Arcana side quest.
You need to harvest one type of flower from the field, using only 3 cards.
But which flower?
There are lots of anise flowers in the surrounding pots.
Enchantment:
Before enchanting, make sure you have place the 6×6 Field signpost to cover all of the flowers.
Enchantment: Field – the appropriate field reference; within the Field brackets, Check Plant – Anise; within the Check Plant brackets, Harvest.
The Tower
Recommended card: Give
You purchase this from Charly for 50 shards.
Unlocking The Tower is not part of any main story quest, but will help to complete the Swamp of Secrets Arcana side quest.
What do I do?
You need to harvest the flowers to put in the pot on the column. However, the plants are not fully grown.
How do I know how long they will take to grow?
When you approach the flowers, information pops up about the type of flower and the stage of growth, including how many more days are needed.
Enchantment:

You don’t need to use multiple loops, you can do the instructions separately as you have up to 100 cards to use.
Enchantment:
Move – Top Left: 4 tiles; Loop (A) – 3 turns;
within the first Loop (A) brackets: Move – Top Right: 1 tile; within the first Loop (A) brackets: add another Loop (B) – 2 turns;
within the second Loop (B) brackets: Water; Rapid Growth;
within the first Loop (A) brackets, but not the second Loop (B) brackets: Harvest;
outside of the loops: Move To – face; Give – Feverfew Flower.
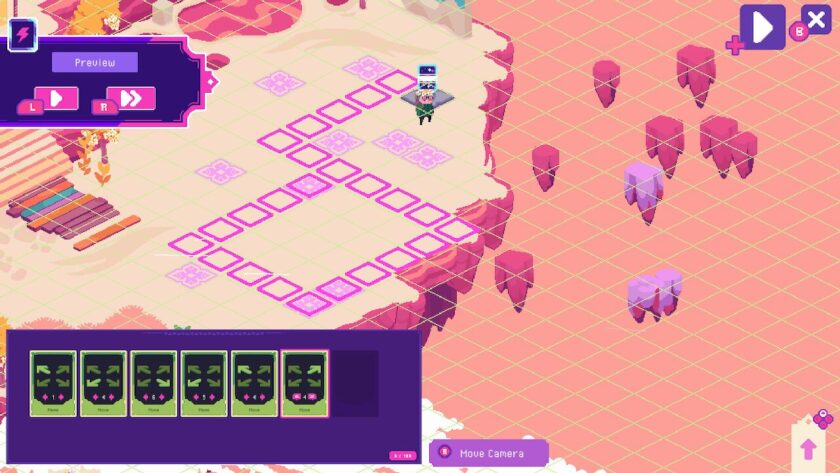
The Hanged One
Recommended card: none
Unlocking The Hanged One is not part of any main story quest, but will help to complete the Swamp of Secrets Arcana side quest.
To access the area, you’ll need to complete the Spell Jar: Bridge over Swampy Waters.
Is there a specific order to move over the tiles?
Yes, Look around the area, do you see anything which might indicate numbers?
Enchantment:

Enchantment: Move – Bottom Left: 3 tiles; Move – Bottom Right: 5 tiles; Move – Bottom Left: 1 tile; Move – Top Left: 4 tiles; Move – Top Right: 4 tiles; Move – Bottom Right: 2 tiles.
Return to the Table of Contents
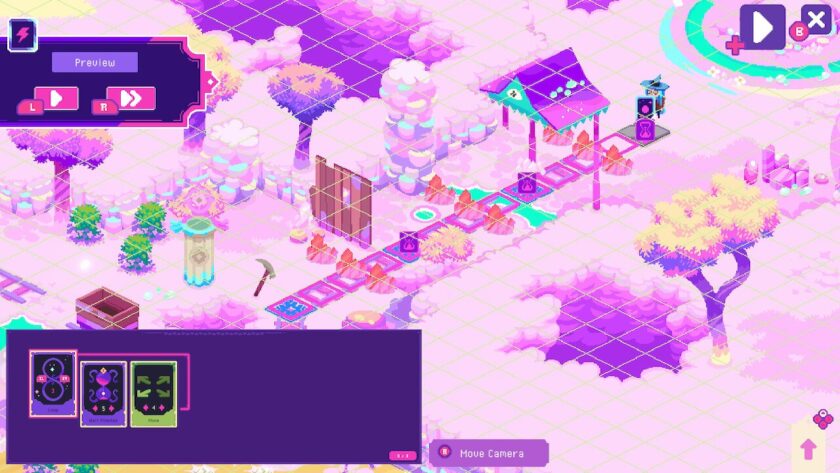
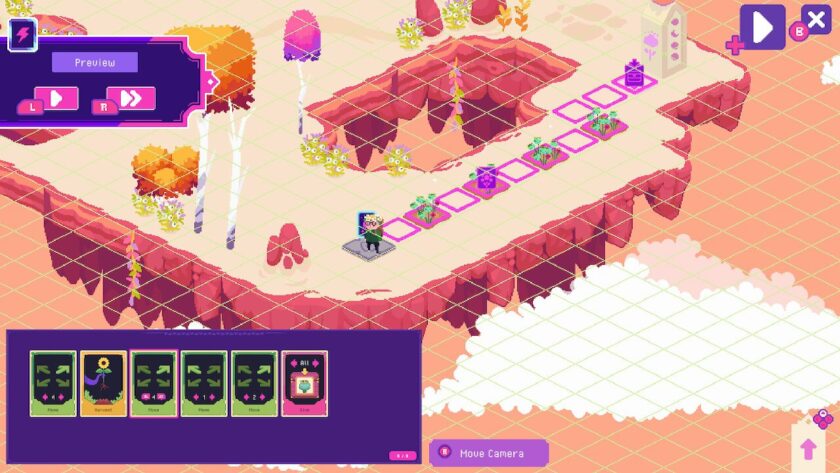
Arcana Puzzles – Cloud Realm
There are 6 Arcana Constructs in the Cloud Realm.
The World
Recommended cards: Move; and Give
You will already have Move and you purchase Give for 50 shards from Charly.
As part of the Entering the Cloud Realm main quest, you’ll need to use The World to give the charged crystals to the appropriate orb.
Enchantment:

Enchantment: Move – Bottom Left: 2 tiles; Give – Charged Tiger Eye; Move – Bottom Right: 1 tile; Move – Bottom Left: 2 tiles; Give – Charged Clear Quartz; Move – Bottom Left: 2 tiles; Move – Top Left: 1 tile; Give – Charged Amethyst
The Hierophant
Recommended cards: Give & Take
You purchase these as a single item from Charly for 50 shards.
As part of the Finding Lilias main quest, you need to gain entrance to the ruins. The two pots on top of the columns and the bed of mixed flowers, implies you need to gift something.
What do I gift?
Referring to the information on flowers in the Book of Shadows, you’ll find that the flowers growing can be fused into two new seeds: Eldritch Radish and Golden Mold.
Enchantment:

You can harvest the flowers in any order, but make sure you fuse the seeds before trying to give them.
Enchantment: Move – Bottom Left: 1 tile; Harvest; Move – Top Left: 1 tile; Harvest; Move – Top Right: 2 tiles; Harvest; Move – Bottom Right: 1 tile; Harvest; Fuse Seeds – St John’s Wort flower and Marigold flower; Fuse Seeds – Meadowsweet flower and Celandine flower; Move To – crescent; Give – Eldritch Radish seed; Move To – heart; Give – Golden Mold seed
The Lovers
Recommended card: none
Unlocking The Lovers is not part of any main story quest, but will help to complete the Cloud Realm Arcana side quest.
Is there a specific order to move over the tiles?
Yes, and not all tiles are needed. Look around the area, do you see anything which mirrors the highlighted tiles?
Enchantment:
The clue is in the purple rocks to the right of the puzzle.
Enchantment: Move – Top Left: 1 tile; Move – Bottom Left: 4 tiles; Move – Bottom Right: 6 tiles; Move – Bottom Left: 5 tiles; Move – Top Left: 4 Tiles; Move – Top Right: 4 tiles.
Death
Recommended card: Field
You receive Field at the start of Ritual of Raven, however, you will need a 3×3 field signpost. You can purchase one from Pistachio for 80 shards, or temporarily use an existing one.
Unlocking Death is part of Wolfgang’s first friendship quest.
How do I create 9 peppermint seeds?
You don’t need to, the seeds are already in Death’s inventory.
Enchantment:
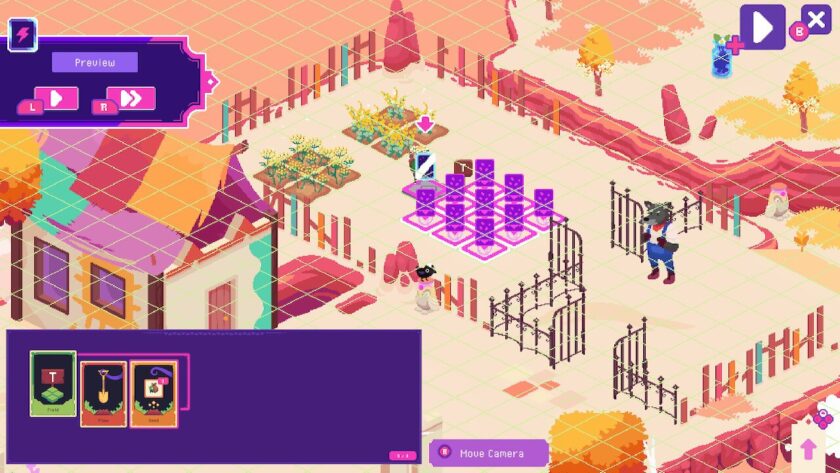
Before enchanting, make sure you have place the 3×3 Field signpost to cover all of the flowers.
Enchantment: Field – the appropriate field reference; within the Field brackets, Plow; within the Field brackets, Seed – Peppermint seed.
Judgement
Recommended card: Loop; and Give
You purchase Loop for 150 shards and Give for 50 shards from Charly.
Unlocking Judgement is not part of any main story quest, but will help to complete the Cloud Realm Arcana side quest.
To access the area, you’ll need to complete the Spell Jar: Not the Foggiest.
I’ve harvested the poppies, but it doesn’t unlock Judgement.
Look carefully at the column. First note the picture of the flower, and then note the markings on the side.
Enchantment:
You need to harvest the second poppy fruit under a waning moon.
Enchantment: Move – Top Right: 4 tiles; Harvest; Move – Top Right: 4 tiles; Move – Top Left: 1 tile; Move – Top Right: 2 tiles; Give – Poppy Fruit.
The High Priestess
Recommended card: none
Unlocking The High Priestess is part of Sage’s first friendship quest.
Is there a specific order to move over the tiles?
Yes, and not all tiles are needed. Look around the area, do you see anything which shows a path?
Enchantment:

Enchantment: Move – Bottom Right: 3 tiles; Move – Top Right: 2 tiles; Move – Bottom Right: 2 tiles; Move – Bottom Left: 4 tiles; Move – Top Left: 2 tiles; Move – Bottom Left: 1 tile.
Return to the Table of Contents
Special Gifts
Each character in Ritual of Raven requires 3 special gifts, each leading to a friendship quest. Gifting is not possible until after the Something must be done! main quest, and some gifting forms part of the main quests. Some gifts will be rewards from other friendship quests and some will appear after certain quests have been completed. Click on the character’s name to reveal the gifts, click on the gift to reveal it’s location. If you don’t find the gift straight away, check again at a later point.
Bowie
Gift 1: Book about Music (A History of Weather Folk Songs)
On the floor in the Library.
Gift 2: Lyrics Sheet
Found in the graveyard, after completing Ghostly Unveiling side quest.
Gift 3: Drum
You can buy this from Pistachio, for 1,600 shards.
Charly
Gift 1: Sorrel Flower
Use an Arcana Construct to grow this.
Gift 2: Tea Set
You get this by portal fishing in Nevar Village.
Gift 3: Weird Bone
You get this by portal fishing in the Cloud Realm.
Coco
Gift 1: Mini Fig
Under a tree near the initial location of The Sun, behind the Spell Jar: Thorny Problems.
Gift 2: Crystal Dice
Received from Calytrix after completing her second friendship quest.
Gift 3: Wedding Invitation
On the ground, just outside your house, after completing Coco’s second friendship quest.
Dan
Gift 1: Seedcake
You can buy this from Coco for 160 shards.
Gift 2: Hortense’s Soup
You get this from Hortense after completing the Find Out More About the Ruins main quest.
Gift 3: Tray
On the ground, near the initial location of The Moon, behind the Spell Jar: Flawless Crossing.
Pistachio
Gift 1: Handplane
You find this in the Crystal Forest, near the Spell Jar: Flawless Crossing.
Gift 2: Clear Quartz Fragment
Use an Arcana Construct to Fuse Crystals to create this.
Gift 3: Advertisement Poster
On the Library wall, near the desk for Spell Jar recipe pieces.
Raven
Gift 1: Birdhouse
You can buy this from Pistachio for 50 shards.
Gift 2: Stone Relief Fragment
On the ground, near the bridge behind the Spell Jar: Bridge over Swampy Waters.
Gift 3: Raven nest
You find this in a tree on the shortcut revealed by Spell Jar: Mist Walk.
Sage
Gift 1: Piece of Tarot Art
Inside the ruins in the Cloud Realm.
Gift 2: Moondo’s Article
Received from Moondo after completing his first friendship quest.
Gift 3: Charged Moonstone
Use an Arcana Construct to Fuse Crystals to create this and then use the Moon Shrine to charge it.
Other Nevar Village Residents
Huxley
Gift 1: Big (Tall) Bookcase
You can buy this from Pistachio for 30 shards.
Gift 2: An Updated History of Corbins
Received from Pip after her second friendship quest.
Gift 3: Abandoned Letter Draft
Found outside the Library, after completing Umbrielle’s second friendship quest.
RGB
Gift 1: Odd Spaceship Part
You get this by portal fishing in Nevar Village.
Gift 2: Satellite Dish
You get this by portal fishing in the Swamp of Secrets.
Gift 3: Spacepass
Reward for completing the side quest: Scrap Museum.
Umbrielle
Gift 1: Elderflower
You can pick this in the Crystal Forest.
Gift 2: Concerned Citizen Poster
You find this near the entrance to the Crystal Forest.
Gift 3: Newspaper
You get this by portal fishing in the Cloud Realm.
Crystal Forest Residents
Calytrix
Gift 1: Liquid Opal
Use an Arcana Construct to extract it, near Calytrix’s home.
Gift 2: Essential Oil Burner
You get this by portal fishing in the Crystal Forest.
Gift 3: Appreciation Ticket
Reward for completing the side quest: Crystal Museum.
Pip
Gift 1: Old Corbin Picture (Picture of a Corbin).
On the floor in the Library.
Gift 2: Book about History (A History of Corbins)
It will appear on the floor in the Library during the game.
Gift 3: To the Mages of Corbin
You get this by portal fishing in the Crystal Forest.
Swamp of Secrets Residents
Hortense
Gift 1: Swampy Potion
Received from Charly after completing her first friendship quest.
Gift 2: Knitting Needles
In the Swamp of Secrets, near to where Raven found the rune shards and the southwest fast travel point.
Gift 3: Cloudpuff Flower
Use an Arcana Construct to grow this.
Moondo
Gift 1: Journal Article
You get this by portal fishing behind the Witch’s Cottage.
Gift 2: Fungi Kraken’s Records
Received from Raven after completing his second friendship quest.
Gift 3: Rune-like Tablet
In the Cloud Realm, in the area behind the Spell Jar: Not the Foggiest.
Cloud Residents
Lilias
Gift 1: Message in a Bottle
You get this by portal fishing in the Cloud Realm.
Gift 2: Liquid Amethyst
Use an Arcana Construct to extract it.
Gift 3: Magic Show Poster
On the outside wall of the Diner.
Wolfgang
Gift 1: Peppermint Seed
Use an Arcana Construct to Fuse Seeds to create this.
Gift 2: Plushie
You get this by portal fishing in the Cloud Realm.
Gift 3: Dry Stone Wall
You can buy this from Pistachio for 300 shards.
YT
Gift 1: Cryptid Figurine
You get this by portal fishing in the Swamp of Secrets.
Gift 2: The Nevar Times
From Umbrielle after completing her second friendship quest.
Gift 3: Eldritch Radish
Use an Arcana Construct to grow this.
Return to the Table of Contents
I hope this Ritual of Raven Guide helps you and that you are enjoying the magic of Ritual of Raven!
Do you like our content?
Support LadiesGamers as a member on Patreon!
 Or buy us a cup of coffee or tea on Ko-Fi!
![]()
This was super helpful, thank you!! I thought the game was super fun, but I did have one issue. I’m almost finished up end game, but I can’t remember where I found the dragon scale that I donated. I’ve been fishing for days!! And I can’t move forward because a fellow I need is busy until I find it!!! Three times I hit this bottleneck. Teeny blemish on a fun game. I think my favorite part is the sound/music.
I’m really pleased that you found the guide helpful. I had a similar issue with the electrical component needed for Pistachio! I think the dragon scale was from the Crystal Forest portal. Hope you find one soon!
Do you recall where you got the electrical component for Pistachio?
Hi Em, Yes I do, you can find it by portal fishing in the Swamp of Secrets for 25 shards. It took quite a long time before I found one though. Good luck, Lynne
It really helped me when I was playing the game!!! The writing is so well organized and easy to follow! 🙂
and I have one question. How do I get ‘all cards’? I’m stuck here and can’t reach the cloud stage…
Hi there, glad to hear that the guide has helped your journey so far. You need the ‘Give’ card to get into the Cloud Realm, which you can buy from Charly for 50 shards. ‘All’ is an option of the ‘Give’ card, meaning you handover all of the specified item you have in your pocket, rather than a specific number. As you only have one each of the charged crystals available to give, ‘All’ or ‘1’ would work. Hope this means you get into the Cloud Realm soon. Kind regards Lynne
Thank you so much for your kind explanation!!! It really helped me move on to the next step:) Have a great day and I hope you’re filled with happiness~!! I’ll be back often!!;)
So pleased you’ve got into the Cloud Realm, thanks for letting me know. I hope you continue to enjoy Ritual of Raven. Kind regards Lynne
This guid is super helpful! I’m having issues though with the judgment card. I have the exact settings that show on the picture that’s posted and my moon is in waning but it’s still not working. I have the fruit listed as well.
I’m happy that you are finding the guide helpful. If the moon is waning, so that the poppies are fruit rather than flowers, and you’re harvesting just the second one, then the only thing I can think of is to change the ‘Give’ to ‘1’ rather than ‘All’, just in case you’ve got other poppy fruit in your pocket. Let me know if that works. Kind regards, Lynne