


I loved the game Lucy Dreaming quite a bit when I played it, you can read my recent review of the game here. I liked it so much I wanted to do a story walkthrough to help anyone stuck on puzzles. This little point-and-click adventure has some head-scratchers in it, but players should do their best to solve puzzles on their own.
This walkthrough is Spoiler-Free, so please keep the comments spoiler-free as well. This is not a 100% walkthrough, as most of the achievements are not listed here. Happy point-and-clicking! And if you want to know more about the developers behind the game, here’s our interview with them!
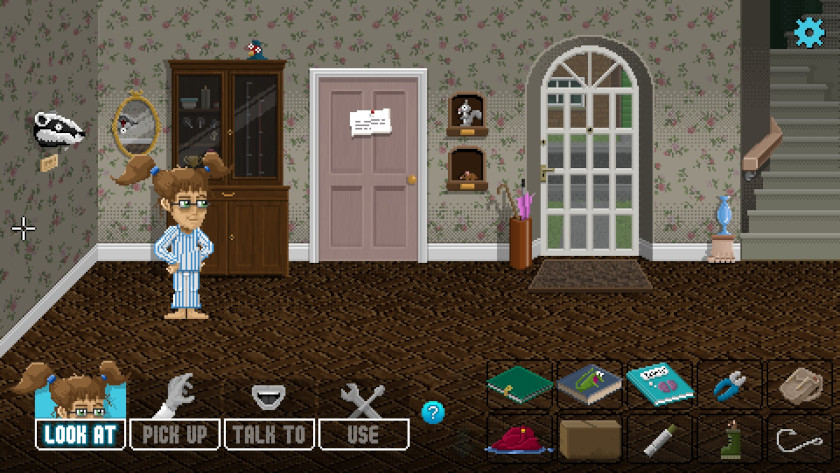
Tutorial: Lucy’s House
Pick up Lucy’s Diary from the side table by her bed. The diary will serve as a way to keep track of quests.
Pick up both pieces of Stuffed Animal Filling off of the floor.
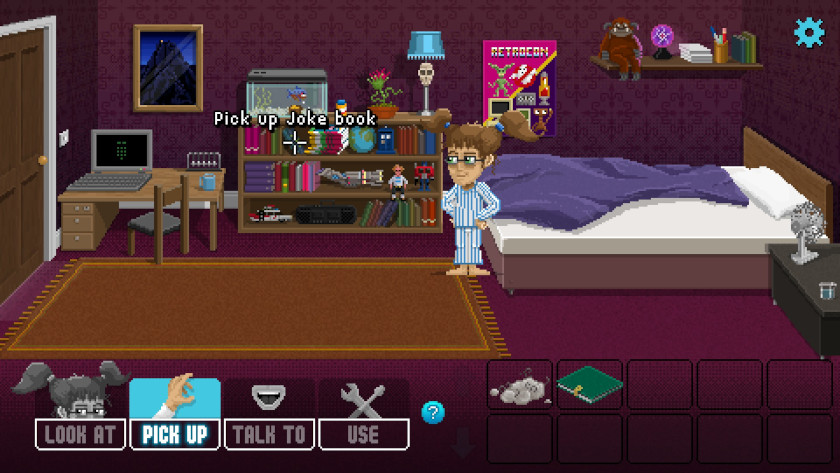
On the top shelf of her bookcase, pick up the Joke Book. Click “use” on the Joke book and then on Geoff the Venus Fly Trap. Tell the plant all six jokes until there are no more left in the book. Pick the Silver Key it drops.
Use the Silver Key from the plant to open the top drawer of Lucy’s desk. Gain the Duct Tape.
Pick up the Fish Food and feed the piranha. While the fish is distracted, reach into the tank and take the Gold Key out of the treasure pile. Use it in Lucy’s Diary.
Head out of Lucy’s Room into the Hallway. Pick up the piece of Stuffed Animal Filling on the floor.
Head into the room next to Lucy’s. This is the Bathroom. Open the medicine cabinet and pick up the bottle of Sweet, Sweet Headache Medicine. Then take a Plasters (band-aid).
Head back out into the Landing; continue to the left. There will be two more Stuffed Animal Fillings on the floor.
Look at the door with the caution tape on it, this is Lucy’s brother’s room or Lloyd’s Room. There will be a little keyhole that players can interact with. Talk to Lucy’s brother through the keyhole until all of his dialogue is exhausted.
Head Downstairs. There will be a toilet brush (Bog Brush) in the flower vase on the table to the right of the stairs. Take it. Look at the vase to the left of the stairs.
Pick up the Vole on the shelf underneath the squirrel. It’s on the wall between the Outside door and the kitchen door.
Use the “pick up” option on the badger’s head at the end of the hall. Lucy will get the Badger’s Glass Eyeball.
Chapter 1: Positive Influences
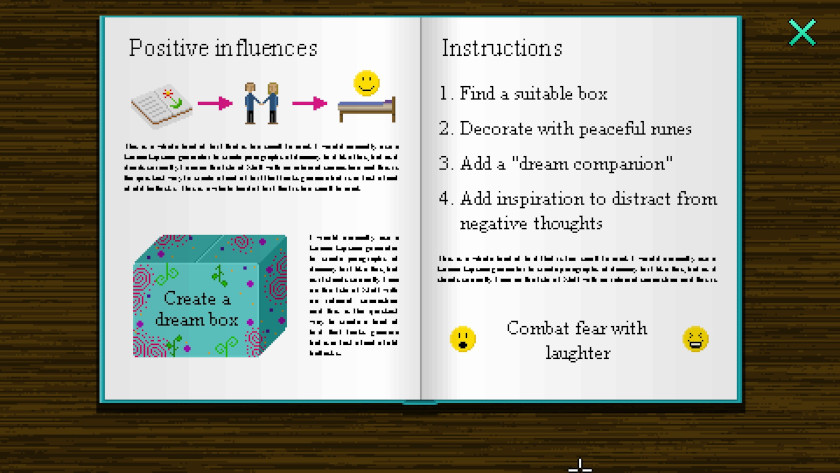
Go all the way to the right of the screen. Go into the Lounge. Pick up the Psychology Book from the table. Lucy will read it. It will suggest that she builds a Dream Box.
Go back into the Hallway.
Interact with the Garage door. Head in and pick up the Rucksack off of the ground near the washing machine. Interact with the plug-in for the washer. Take Lucy’s Wet Clothes from the washer. Pick up the Small Box off of the wall over the washing machine. Interact with the lint tray of the washer and take out the Lump of Lint. There will be a pair of blue Pliers on the wall; pick those up as well.
Walk back to the Lounge. Use the Bog Brush on the fireplace. Pick up the magazine from the coffee table. It will give Lucy some Chapstick. Use the Chapstick from the magazine on the Small Box. Press “use” on Lucy’s Wet Clothes and hang them up on the ceiling fan. Use the switch on the fan to turn it on high until the clothing is dry.
Use the door to head back into the Hallway. Use the Duct Tape over the small hole next to the lounge door. Interact with the Grandfather Clock in the hallway. Make the bell toll one o’clock. After that, pick up the Wellie (boot) off of the floor to the left of the clock. Pick up the Hook from the salmon’s mouth on the wall by the stairs with the Pliers. Use the Pliers on the Fish Hook again to straighten the hook out into a sewing needle.
Head Upstairs and interact with the keyhole in Lloyd’s Room again and exhaust the dialogue options again with him.
Change Lucy into her now-dry clothing and head Outside. Use the Wellie with the gerbil inside on the drain pipe at the right of the house. Pick up the body of Mr Fumbles as he falls from Lloyd’s window. Use the Stuffed Animal Filling and the Lint to fill Mr Fumbles back up, then use the Thread from the Badger’s Glass Eye and the Fishing Hook that was in the salmon and straightened with the Pliers to sew the stuffed bear back up.
Once Mr Fumbles is all sewn back up, go back to Lucy’s Room. In order to head into the Dream World, put Lucy’s Dream Box on the floor next to her bed; she will have had to draw the runes on already with the Chapstick. Put Mr Fumbles the Bear into the Dream Box along with the Joke Book. Change into Pajamas and click “use” on Lucy’s Bed.
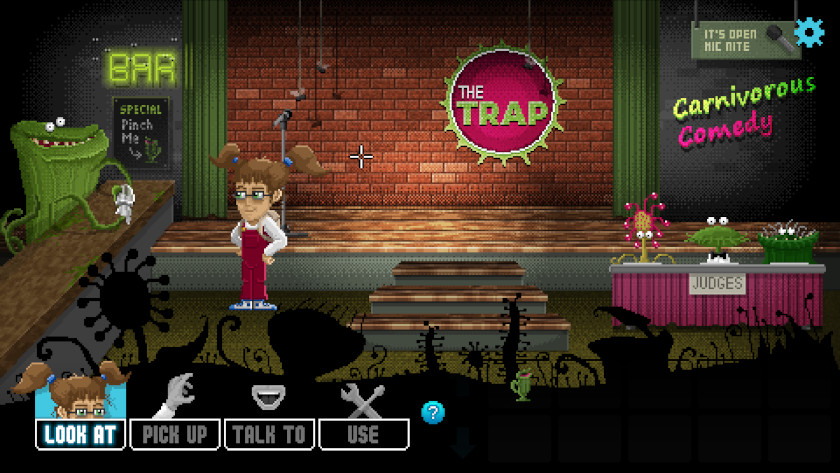
Now Lucy will be in her First Dream. Interact with the Broken Rope on the left side of the screen. Then, talk to Mr Fumbles. Ask him to use the Broken Rope for you. Then click “use” on the Brake lever under the Broken Rope. Talk to the bartender and exhaust the dialogue options. Use the microphone to tell the following jokes:
- Why don’t carnivorous plants like wearing trousers? Because their flies keep getting stuck.
- Why did the pitcher plant enjoy the all-fly diet? It was so easy to stick to.
- Did you hear Snoop Dog’s latest song about interplanetary travel? It was a Venus Flight Rap.
- Why are carnivorous plants so good at keeping secrets? They keep their traps shut.
- What’s a Venus Fly Trap’s favorite game? Snap!
- Why do carnivorous plants like old adventure games? They are full of bugs.
Then select the option to end your stand-up session. The judges will hold up signs after your performance. These are randomly generated. These numbers will be the Computer Code to get into your computer. Talk to the barman and ask him what your prize will be. He will give Lucy his pet fly Herman. Use the Pinch Me Pitcher to wake up.
Lucy is now back in her Lucy’s Room. Pick up the Dream Box off of the floor, then use Lucy’s Bed again. Click “use” on Herman the Fly in Lucy’s inventory while she is falling in her dream.
Do you like our content? Support LadiesGamers on Patreon!
Check out our Tiers and Benefits and join us.

Chapter 2: Breaking Bread
Interact with Lucy’s Computer. Use the numbers on the dream judge’s cards, the Computer Code, to unlock the email. Click on the attachment in Lucy’s email. After Lucy is done reading, interact with her clothing to put it back on.
Go back Downstairs. Use the Vole from the wall between the kitchen door and the outside door to open the new Package on the table by the stairs. Take the Pufferfish from the package as well as the Formaldehyde and the Beetles. Use the Pufferfish on the floor mat by the Garage door.
After the spikes are filed down, head Outside. Interact with the Bike on the left side of the screen. Use the Plaster to patch the hole in the tire of the bicycle, then use the smoothed-down Pufferfish to refill the tire with air. Now Lucy can fast-travel to different places around town. This will only open up the Library for now.
Go to the Library by clicking on the map in the upper-righthand corner of the screen. Pick up the Trowel outside the Library. Go inside the building. Talk to the librarian and exhaust her dialogue. She will give Lucy a brochure of library products, the SATAN Catalogue. Interact with the SATAN Catalogue and a Library Card will fall out. Use the Library Card with the library machine in the back room and think of a Poetry Book About Ill-Fated Lovers. Pick up the Poetry Book About Ill-Fated Lovers book from the machine. Read the Poetry Book About Ill-Fated Lovers, then talk to the librarian again. This will add the Church to the list of places available on the map.
The Church and Library
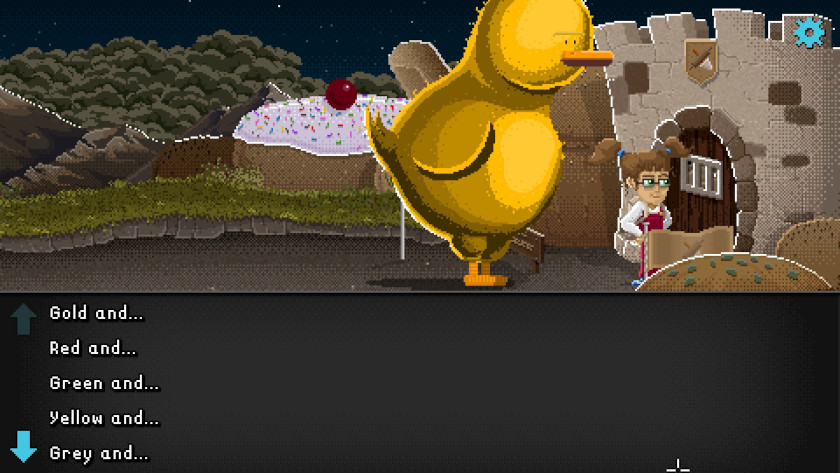
Go to the Church. Talk to the man out front about the birds that are stealing things from people. Head into the church itself. There is one woman inside the church on the very front pew; exhausts her dialogue. Take a look at each one of the Church windows in order. The order of the colors that Lucy mentions will be the order the bells need to be rung in.
- The first window features a Blue moon over Red poppies in a Yellow desert.
- The second window shows two White mountains lit by Yellow sunlight.
- The third is a Blue dragon breathing Red fire over the Brown grass.
- So the order of the bells is Blue, Red, Yellow, White, White, Yellow, Blue, Red, and Brown.
Ring the bells in the right order. Head outside the Church and interact with the Pile of Treasure. Interact with it again and Lucy will pick up the Hat Pin. Then, interact with the Monkey Puzzle Tree outside of the Church to the left of the door. Using the Trowel, dig in the patch of earth under the tree and gain the Photograph with holes in it. Go back to the man with the camera who is obsessed with the birds. Put the Hat Pin in his hat. Once he is gone, take his Camera. Use the Camera to take a Selfie.
Using the map fast travel, go to the Library. Interact with the SATAN Machine in the first room. Use the Library Card with the machine and it will give Lucy the error: MISMATCHED FACE. Use the Selfie on the Library Card to forge an Unconvincing Fake Library Card. Use the Photograph of the couple with the Poetry Book About Ill-Fated Lovers. Line up the library stamp on the Photograph and inside the book, and it will give players the pin code for the forged Unconvincing Fake Library Card. I believe it was 1015 in both of my playthroughs. Interact with the SATAN Machine in the front room of the Library once more. Search for articles about the Disley Ferret and read everything the machine has to offer. This will add two new locations to Lucy’s map: the Fig Mansion and the Town Centre.

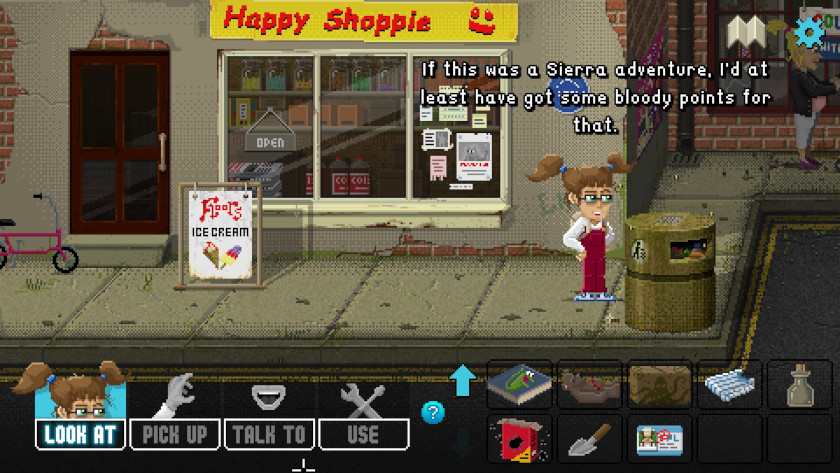
Bubblegum FrootieShootie
Go to the Town Centre first. Clean up the trash around the trashcan. There will be a Penny underneath. Take the Penny. Interact with the mother with the stroller until her dialogue is exhausted.
Next, go back to the left and head into the Happy Shoppie. Inside the fridge in the right part of the screen is the drink that the mother wanted, a Bubblegum FrootieShootie. Take one from the fridge. Interact with the employee on the floor. Make sure to exhaust all the dialogue options. Then, set the Bubblegum FrootieShootie drink on the floor next to him. He will re-price it and Lucy can then pick it back up again. Use the Bubblegum FrootieShootie with the cashier and get the bottle for free.
Take the Bubblegum FrootieShootie back to the parent outside and give it to her. She will leave. Pick up the Blueberries that she left behind. Look at the Ferret Statue at the end of the parking lot and the Vending Machine and the label under the vending machine.
While still in the Town Centre, go into the Charity Shop. Talk to the cashier. Put the Penny in the donation jar on the counter and take the Metal Detector.
Go to Fig Mansion and interact with both the people there until there are no more dialogue options. This will unlock the Village Fete. Look at the vase on the mantel of the fireplace.
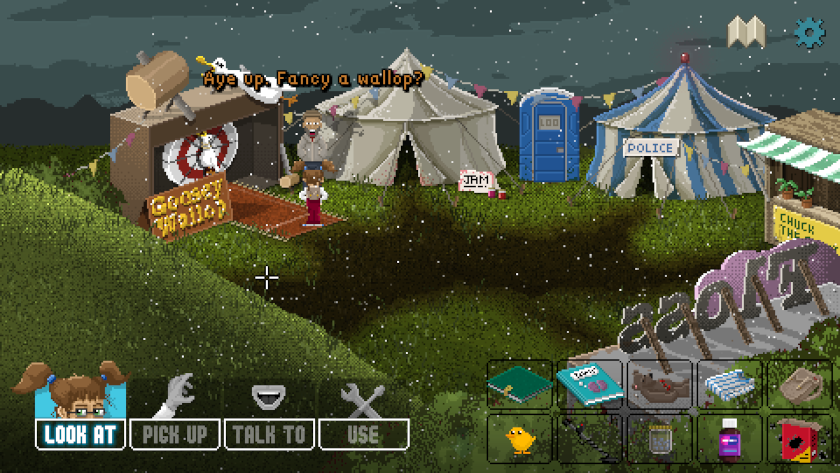
It’s time for the Village Fete. Use the map to travel there, then head into the WI Tent. Talk to the Vicar about the jam competition for the fete. Make sure to pick up the Empty Jar off of the jam table next to the Vicar.
Lucy’s House and the Fete
Use the map to travel back to Lucy’s House. Head Upstairs and into the Bathroom. Interact with the cistern of the toilet and drop the Blueberries inside. Then put them into the Empty Jar. Add the Formaldehyde. Add the Sweet, Sweet Headache Medicine also called Gulpol. Now the jam is ready for the competition.
Go Outside Lucy’s House and use the Metal Detector. Use the settings “Nickle” and “5-10 years.” This will give Lucy a Token.
Head back to the Vending Machine in the Town Centre. Use the Token on the machine’s slot to get the Fuzzy Wuzzy Ducky Toy.
Go back to the Fete. Put the Blueberry Preserves on the table. The Vicar will eat some and award it first prize. Pick up the prize Rosette off of the jar and show it to the woman in the tent, Paula Hollyrood, after exhausting her dialogue. She will give Lucy a copy of her Baking Book.
Head back to Lucy’s House and go to her Bedroom. Put the Dream Box on the floor and put the Baking Book and the Fuzzy Wuzzy Ducky inside. Then put on some pyjamas and use Lucy’s Bed.
Second Dream
This will put Lucy in her Second Dream. Interact with the Duck. Head to the left then interact with the door. The troll behind the door will ask a riddle. The answer is:
- Green
- Purple
Talk to everyone in town until their dialogue is done. This will give Lucy a Sticker and a couple of Pots of Paint. Use the Sticker to fix the little troll girl’s bread kite. Go into the Use the Sticker to fix the little troll girl’s bread kite, and interact with the Bapmaster. She will give Lucy some valuable information and also a free Lovebun Sample from the table by the door.
Use the Pinch Me Pitcher to wake up. Once in Lucy’s Bedroom, interact with the fan beside her bed to change the direction of the air and make sure the air is blowing to the left. This will create a westerly breeze in the Second Dream.
Go back to sleep. Ask the little troll girl with the kite to let out her kite. Use the Pinch Me Pitcher to wake up. Then change the direction of the wind again to make it blow east or to the right side of the screen.
Yeast Man Sticker
Go back to sleep. Now the kite will be wrapped around the overhead wires. Turn on the Self-Electrifying Danger Bowl at the scientist’s stand. This will electrify the troll’s hair and make it stand up. He will give you a Yeast Man Sticker. Use the Yeast Man Sticker with the little troll boy laying on the ground. He will give you a Man-At-Barms Sticker. Talk with the kids again until their dialogue is all finished. Next, use the Paints on the Lovebun Sample. Give the Badly Painted Lovebun Sample to the troll working the sticker stand. It will only last for a few seconds, so don’t waste any time; click on the Action Figures, and he will let you have one.
Use the Pinch Me Pitcher to wake up again. Put the Joke Book back in the Dream Box, then go back to sleep by using the Bed.
Once back in the First Dream, pick up the Umbrella by the bar. It’s a Sphagnumbrella, which absorbs liquids instead of keeping you dry. Talk to the barkeep again. Trade your Man-At-Barms Sticker for an Evil Brith Sticker.
Pinch Me Pitcher
Use the Pinch Me Pitcher to wake up. Switch out the Joke Book for the Baking Book. Switch out the Fuzzy Wuzzy Ducky Toy for the Fixed Bear. Make sure the fan is blowing to the left again.
Use the Bed to head back into the Second Dream. Talk to the young troll girl with the stickers. Give her the Evil Brith Sticker, and she will trade you a Cob-oto Sticker. Trade the Cob-oto Sticker to troll who is guarding the front gate. He will trade it for his prized Skeletorilla Sticker, which is reflective.
Head back into the Bakery. Ask Mr Fumbles the Bear to distract the Bapmaster. Interact with the oven, and the alarm will go off.
Ask Mr Fumbles the Bear to distract the Bapmaster again.You only have a few seconds: put the Skeletorilla Sticker in the alarm and then open up the oven. Throw the Action Figure inside the oven’s fire. The Bapmaster will then open the window.
Wake up with the Pinch Me Pitcher. Pick the Dream Box from the floor.
Go to sleep. Use the Sphagnumbrella on the Monster Drool. Then Lucy will automatically wake up.
Dream Box in Lucy Dreaming
Put the Dream Box back on the floor by the bed and put in the Baking Book. Put in the Fuzzy Wuzzy Ducky Toy. Pick up the Glass of Water from Lucy’s bedside table and empty it into the fish tank. Set the now Empty Glass back by the bed on the table.
Go back to sleep. Pick up the Bag of Flour from the shelf. Look at the sign; it will have Lucy’s Fig Hall membership number.
Wake up with the Pitcher. Exchange the Fuzzy Wuzzy Ducky Toy with the Fixed Bear. Go back to sleep.
Interact with the recipe book at the back of the Bakery. Give the starter the Bag of Flour and the Sphagnumbrella with Monster Drool. Then pick up the now Satisfied Starter. Pick up some Splintered Wood from the hole in the floor that the Duck made, then pick up the Candle next to the recipe book. Head back to the oven, and use the Splintered Wood and the Candle to get the oven back on. Put the Satisfied Starter in the oven and then take out the Monstrous Love Bun. Pick up a Barm Cake from the shelf.
Use the Pinch Me Pitcher to wake up. Pick up the Dream Box off of the floor.
Use the Bed to go back to sleep. Use the Monstrous Love Bun on the monster that is chasing you. Lucy will automatically wake up.
Chapter 3: Take a Break
Now that Lucy remembers her Fig Hall number, head back there and talk to Howard. Give him the number and he will print a pass. Pick up the Visitor’s Pass. Then chat with Esme until there are no options left.
Use the map to go back to Town Centre. Go into the now-open Pub. Talk to the man on the computer, Woody. He will ask for three local words.
- Head to the Library and use the machine in the back room to think of a dictionary. Pull the Dictionary out of the machine. Go back to Fig Hall. Ask Howard if he knows any words for “insipid.” He will direct you to the lunch lady. Talk to her and get the local word for “insipid.”
- Go to the Village Fete and talk with Steward. He will ask for cleaner. Go head to the Library and use the machine in the back room to think of a dictionary. Pull the Dictionary out of the machine. Town Centre and talk with the shop owner. Ask him for the FrootieShootie. Exhaust his dialogue. Go back to the Village Fete and give the FrootieShootie to the Steward. He will give the word for “caustic.”
- Go to the Town Centre and talk to the barkeep about Curly. Then head back outside and talk to the shop owner. Exhaust his dialogue. Go into the shop and head into the Storeroom. Look at the walls. Use the Beetles on the fur coat. Read the word on the wall for the last word, the local term for “leathery.”
Once you have all three words, return to the bar and tell them to Woody. He will then help with the information Lucy needs. Make sure to ask him everything.
Head to the Village Fete. Talk to Steward, and ask him everything. Next, use the metal detector on the mud; use the settings “brass” and “0-5 years.” This will give Lucy a Pound. Go into the police tent and sit in the chair. Bid one Pound on the box of files. Lucy will dig around in the box until she finds the Case File. She will pick it up; click around to read it all.
Town Centre and Village Fete
Go to Town Centre and talk to the police officer.
Go to Fig Hall. Look at the pictures in the cafe. Try to take one off of the wall. Then talk to Howard at the front desk. He will give Lucy a Tote. Interact with the Tote to get the Postcards and the Brochure. Talk to Esme again.
It’s time to head back to Lucy’s House once again. Pick up the Vase off of the stand by the door. Go into the Lounge and pick up one of the Firepokers by the fireplace. Wrap the Poker in the Tote, then use them on the Vase. This will give Lucy the Family Tree.
In Town Centre, interact with the police officer and exhaust her dialogue. She will tell you the date you need. Go into the Charity Shop and interact with the cassette tapes on the floor. The volunteer will tell you not to touch it, and you can volunteer to help them with their paperwork instead. Make sure to use up all the dialogue options.
Third Dream
Now it’s time for the Third Dream. Go to Lucy’s House and go into her Bedroom. Interact with the drinking glass on the side table by her bed, and empty it into the fish tank if needed. Put the Dream Box on the floor and add the Crab Guide and the Duck. Go to sleep.
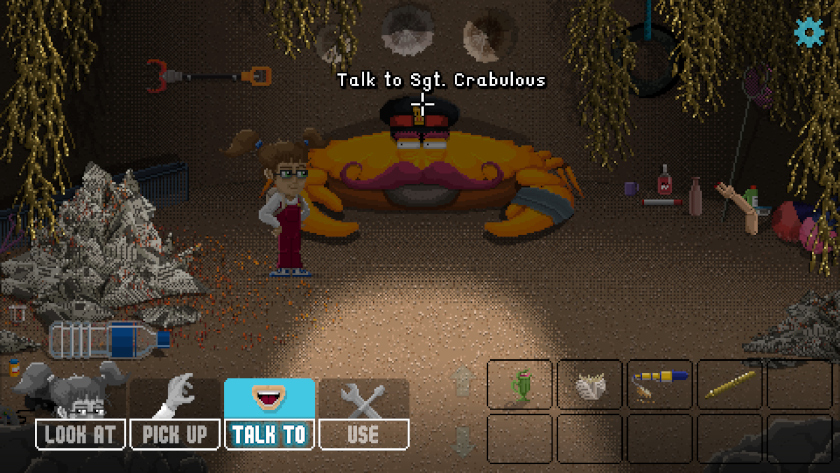
In the Third Dream, interact with the giant crab until her dialogue is spent. Interact with the puddle of brown goo on the ground to the right and then talk with her again. She will tell you the first chip topping you’ll need for the Charity Shop. Next, interact with the Red Sauce on the condiment table. This will get Lucy the second chip topping.
If the glass of water next to Lucy’s bed is empty, the tide will be low. Climb down the ladder and walk down. There will be seaweed just south of the ladder; pick it up and find a Fishing Pole under it. Walk to the left and talk to the crab. He will need some help.
Wake up with a Pinch Me Pitcher and refill the empty water glass by Lucy’s bed in the fish tank.
Bram Cake
Go back to sleep. Use the Barm Cake from Dream Two on the Fishing Rod. Use the Fishing Rod with the Bread to ride the Duck across the lake to the Sergeant’s place. Talk to the crab. Pick up the Six-Sided Gold Pen and the Mannequin Finger from the floor to the crab’s right. Interact with the chip wrappers to the left of the crab to get the third Chip Topping. Use the Fishing Rod with Bread to hitch a ride back to the dock. Give the Mannequin Finger to the chip shop crab lady, and ask her for some Chips. This will give Lucy the fourth Chip Topping.
Another Pinch Me Pitcher will wake Lucy up. Empty the cup by her bed in the fish tank, then swap out the Duck for Mr Fumbles.
Use the Bed to go back to sleep. Give Mr Fumbles the bag of Chips. Look at the trash bin near Mr Fumbles, and you’ll get the fifth Chip Topping. Walk back over to the Hermit Crab Named Kermit and walk by him. Interact with the ice cream cone. Mr Fumbles will come to you; chat with him and get him to climb the rope. Interact with the greenish-looking goop on the sea floor; it will give the final Chip Topping for the Charity Shop Volunteer.
Wake up. Add water to the empty drinking glass again, then swap out the Bear for the Duck in the Dream Box. Ride the Duck across with the Fishing Rod.
Wake up again and switch the Duck for the Bear in the Dream Box.
Go back to sleep. Go inside the Sergeant’s place; Mr Fumbles will help you get the rubber band off. The Sergeant will then give Lucy the Grabber.
Wake up, and pick the Dream Box off of the floor. Go back to sleep. Use the Grabber on the anchor. Lucy will wake up on her own.
Chapter 4: Make Yourself Heard
In order to get the next dream, Lucy will need to head back to the Charity Shop in Town Centre. Give the man all six Chip Toppings. Interact with the box of cassettes on the floor. Lucy will need to pick which one she wants; choose the date closest to the murder date: June 27th. This will be on the last ones in the box. Use the Cassette Tape with the Walkman. This will give Lucy the Cassette Tape she needs.
Head back to Lucy’s House, and go to her Bedroom. Use the Cassette Tape on the cassette player on the bottom shelf of her bookshelf. Listen to the whole interview.
In the Town Centre, there is a new figure. It’s Lucy’s BFF, and she should talk to him. If you exhaust his dialogue, he will give Lucy a comic book called Phantom of the Organ.
Go to Lucy’s Home. There will be a Flyer on the welcome mat. Pick it up and take it with you.
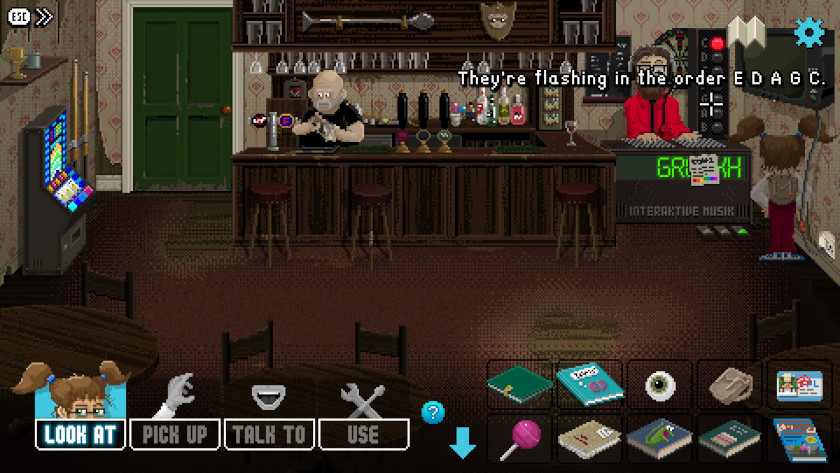
Go back to the pub in Town Centre. There will be a musician there. You can change what music he is playing by interacting with the pedals at the bottom of his setup. They were the same in both of my playthroughs.
- Lively Tune: G A E D C
- Panicked Tune: D E G C A
- Sleepy Tune: E D A G C
Now it’s time for the Fourth Dream. Put the Dream Box on the floor and add the Horror Comic Phantom of the Organ and Mr Fumbles. Interact with the Bed to go to sleep.
Fourth Dream
In the Fourth Dream, Lucy needs to first pick up the Empty Fish Bowl from the right side of the door. Then, pick up the Milk from the stoop. Try to get the Branch from the ground, and Lucy will say she can’t. Talk Mr Fumbles into getting the branch for you. Put the Six-Sided Gold Pen from Sergeant Crab’s place into the hole in the wall of the house. Talk to the Bear. Use the Branch to bend the Pen, and it will turn into a Hex Key. Go into the house. Talk to the man there.
Use a Pinch Me Pitcher to wake up. Lucy will need to go back into her First Dream again, so swap out the Horror Comic for the Joke Book.
In the First Dream, talk to the barman. He will give you the Whoopie Cushion. Use the Pitcher to wake up.
Bakery Book
Use the Bakery Book in the Dream Box to head back into the Second Dream. Catch some plasma flies in the Empty Fish Bowl. Wake up again.
Put the Horror Comic into the Dream Box in place of the Bakery Book. To enter the Fourth Dream again. Give the Hex Key, the Fish Bowl with Plasma Flies In It, and the Whoopee Cushion to the manservant. Pick up the curtains, then pick up the Curtain from the floor. Pick up the Mug from the little table on the left. Go upstairs in the house and look around. Make sure to look at the bats, the horn, and the floor. Use the Blackout Curtains on the hole in the floor. Open the cupboard on the left side of the screen. Take the Key from the plant in the middle of the floor.
Next, go back upstairs and use the Key on the Hatch Door to the right of the screen. It will be behind the place where Lucy enters the room; it’s a little dark and hard to see. Next, enter the Hatch room. Use the Branch to grab the Oil Can from the shelf on the right. Pick up the Bucket from the floor. Go back downstairs and use the Oil Can on the squeaky cupboard. Go outside and grab water from the well with the Bucket. Fill the tea kettle inside the house with water from the Bucket.
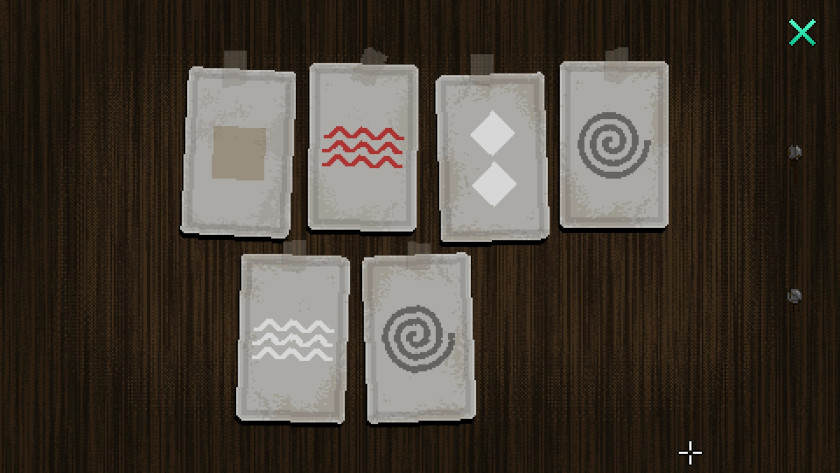
Check the Cupboard in Lucy Dreaming
Inside the cupboard will be a bunch of cards and fixings to make tea with. The cards show the order of how to make a perfect cup.
- Put a Tea Bag in the Mug.
- Turn on the tea kettle. It doesn’t stay warm for long. Pour hot water in the Mug.
- Add one Sugar Cube. Add a second Sugar Cube.
- Stir once with the Spoon.
- Add a splash of Milk.
- Stir again.
- The tea will be perfect.
- If you mess up at any point, you can pour the mug out in the plant and start again.
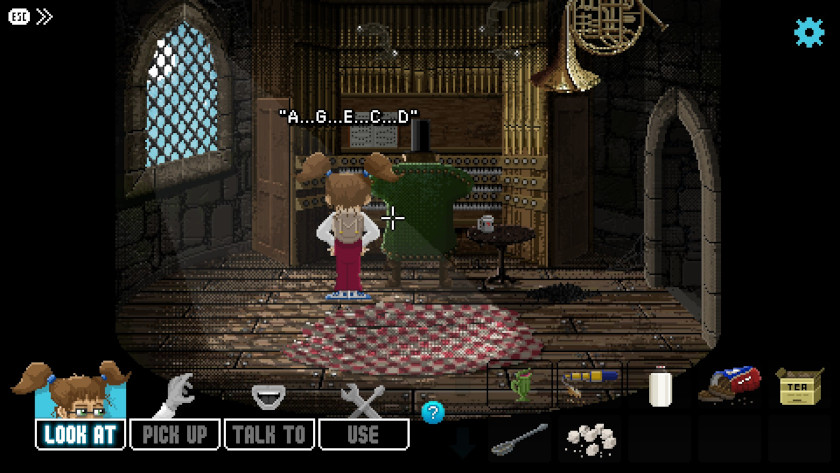
Tea Mug and Choccy Bickies
Go back upstairs. Set the Tea Mug and the Choccy Bickies on the side table. The Master will stop playing to eat; you can then come out the other side of the back of the organ to look at his sheet music. This will read A G E C D. First, we want him to play the Sleepy Tune, which was E D A G C.
- Swap the A pipe with the E pipe. Put the E pipe in A’s old place.
- Pick up the D pipe and put it in G’s spot.
- Put the G in C’s spot.
- Put C in D’s spot.
Step outside and put another Choccy Bickies on the table. Then get the Master to play the Panicked Tune, which is D E G C A. I found it easier to put the pipes back in their correct order before starting again. The original order is on the wall, on a piece of paper.
- Put the pipes back in C D E F G A B order.
- Swap A pipe and D pipe.
- Swap G and E with one another.
- Step out into the music room.
- Pick up the Horn.
Go downstairs and look at the fallen plate. The word PURRCY is on the back.
Use the Pinch Me Pitcher to wake up. Pick up the Dream Box off of the floor and get back in Bed. Use the Horn in the dream; Lucy will wake on her own.
Chapter 5: Accept Your Fate
Interact with Lucy’s computer and read the new email. Head to the pub in Town Centre. Ask the barkeep where Curly went. He will tell you about the School, which will open up that location on Lucy’s map.
Travel to the School. Speak with Curly.
Travel to the Library, and speak with the librarian. Use the SATAN machine with the Library Card in the backroom to get the book you need. This will give Lucy the Blueprints. Look at the Blueprints.
Go back to Lucy’s House. Look at the wall outside on the left part of the screen. Go inside the house, then head left. Look at the wall under the badger’s head. Use PURRCY in the keypad. Enter the room that opens. Look at the Will. Pick up the head and look inside. Pick up the Hammer from the shelves in the room. Use the Hammer on the rug.
Pick up the padlock. Enter the passageway. Pick up the Fallen Fence Post off of the ground to the left. Keep walking all the way left until you come to a bathroom. Interact with the door, then use the Fallen Fence Post on the door. Grab the Plunger.
Go back into the hallway of Lucy’s House. Fast travel to the School. Give Curly the plunger. Head into the school. In the Geography Room, look at the table to the left of the screen and pick up the Screwdriver. Go back into the hall and open Lucy’s Locker. It’s the last one on the left. Pick up the Geography Book from the locker, then use the Screwdriver on the wall between the lockers. Take the Batteries from the other locker.
Back in the Geography Room, place the Joke Book, the Geography Book, and the Baking Book on the floor under the remote. Climb on them to pick up the Remote from its high shelf. Use the Screwdriver on the Remote. Add the Batteries, then use the Screwdriver on the Remote again to put it back together.
Interact with the Tolley holding the TV. Use the Badger’s Glass Eye from Lucy’s House on it to replace the wheel. Move it until it can plug in, then interact with the plug. Use the Tape with the VHS Player and the Remote on the TV.
Do you like our content?
Support LadiesGamers as a member on Patreon!
 Or buy us a cup of coffee or tea on Ko-Fi!
![]()
Very good Walkthrough. We mentioned your walkthrough in our German review, hopefully ok for you.
If somebody like to check our german review: https://www.pcgamehunters.de/2022/10/21/lucy-dreaming/
No problem, thank you for letting us know and for the share!
Thank you for the link! That’s very kind.
Thank you so much for this walkthrough! I needed to use it a couple of times and it was so useful!!